The AIM.
The PROBLEM.
They come in pairs, the members of each pair separated by a single column of bricks set end-on, to which it would probably be unwise to apply much transverse force. Also, they are not particularly carefully constructed; the window surrounds are all about the same size ( as they must all accommodate the same steel window frames ), but far from exactly the same size.
( That was a surprise; it's something of an accident that we constructed the windows with a good deal of tolerance for the width. As it was, we had to do some adjustments later when we started to move the windows around between different positions in the church. MORAL : measure all your window frames before starting ! )
The SOLUTION.
A few informal experiments made it clear that the real problem was simply to make sure that our rectangular objects didn't fall over. Once an object was in position close to its window, quite a gentle push towards the window was sufficient to keep it still, as - even though the "window sill" sloped quite steeply downwards - the frictional forces ensured that the object's weight was carried by the wall below. Provided that we started with the rectangular object close to the real window, and nothing shifted much, we just had to provide for a gentle, essentially horizontal, force. ( Purists might like to quibble with "horizontal", and might even be right, but the important bit is "gentle". )
We achieved this result with an adjustable pressure device, which gently pressed a rubber pad onto the brick wall at each side of the window aperture. The rubber would deform a little to mould itself to the surface, but, once pressed, would be very resistant to sideways movement which would involve not only surface friction but also deformation.
- or, anyway, so it seemed to us. It worked very well, and has continued to do so for many years.
The DETAILS.
 ( Click either picture for a separate jpg version. )
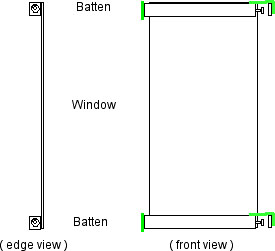
We attached two of our "pressure device"s to the particle board rectangles, one at the top and one at the bottom. We used two mainly for the sake of redundancy, as in practice the "windows" would stand up quite well with just the upper device. Nevertheless, both felt safer.
Each device has a rubber pad at each end; we used rubber from old bicycle inner tubes. At one end, the pad was attached directly to the main batten of the device, while the other pad was attached to the adjustment mechanism. To fit well into our window frames, the end of the batten carrying the pad with the direct attachment was fixed somewhat outside the particle board rectangle, while the other end was somewhat inside the rectangle, allowing the pad to be adjusted to a position outside. Once in position, both rubber pads were significantly, and roughly symmetrically, outside the rectangle. To avoid any skewness, both adjustable ends were at the same side of the rectangle.
The adjustable mechanism is described in the diagram below :
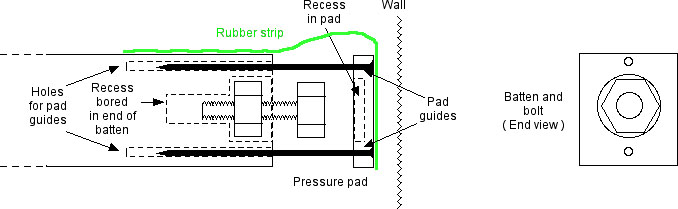
The nut and bolt ( around 5cm long - we were surprised at the magnitude of the variation between the window frames ) rests in a hole bored in the end of the batten. The hole is shaped to allow the screw to be adjusted fairly easily using a spanner. We did not find it necessary to fix the nut and bolt to the batten; once in position, the assembly was satisfactorily rigid, with the nut and bolt firmly held in the recesses in both batten and pad.
The pad is constrained in position in the other two dimensions by the two pad guides ( nails ), which fit fairly loosely into holes bored into the batten.
The rubber strips are glued to the batten and pressure pad, and we found it very convenient to use the strip on the pad to attach it to its batten. ( It would probably be a good idea to attach the nuts and bolts in some similarly flexible way; while we have had no trouble with losing them, it's clearly a possibility. )